Nothing is worse than joining a video call and hearing "We can't see you." A quick webcam test before your meeting, interview, or stream can save you from that moment.
This guide walks you through three ways to check your webcam — using your browser, the Windows Camera app, or Mac Photo Booth. Each method takes less than a minute. If something isn't working, the troubleshooting section at the end covers every common fix.
Method 1: Test Your Webcam in the Browser (Fastest Way)
This is the quickest option. No app to install, no account to create. Just open a page and click a button.
Step 1. Open the webcam test page
Go to the online webcam test in Chrome, Edge, Firefox, or any modern browser. You will see a page with a large Start Webcam Test button.
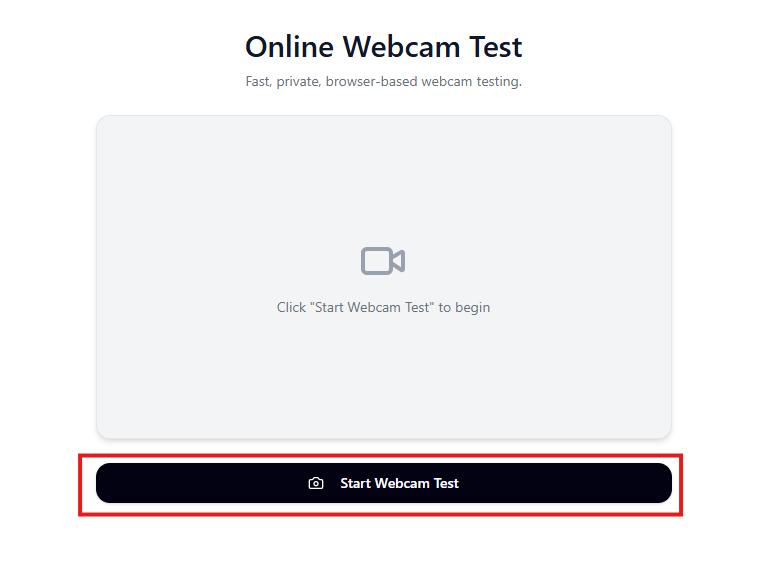
The webcam test page before starting. Click the button to begin.
Step 2. Allow camera access
After you click Start Webcam Test, your browser will ask for permission to use your camera. A popup appears near the address bar.
Click Allow while visiting the site (recommended) or Allow this time if you only want to grant access for this session.
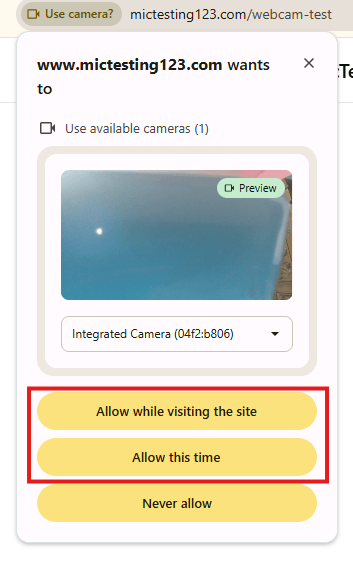
Chrome asks for camera permission. Click "Allow while visiting the site" to proceed.
If you accidentally click Never allow, don't worry — the troubleshooting section below shows how to undo that.
Step 3. Check your video feed
Once you allow access, your webcam feed appears on the page. You will see a live preview of your camera along with details like resolution and quality.
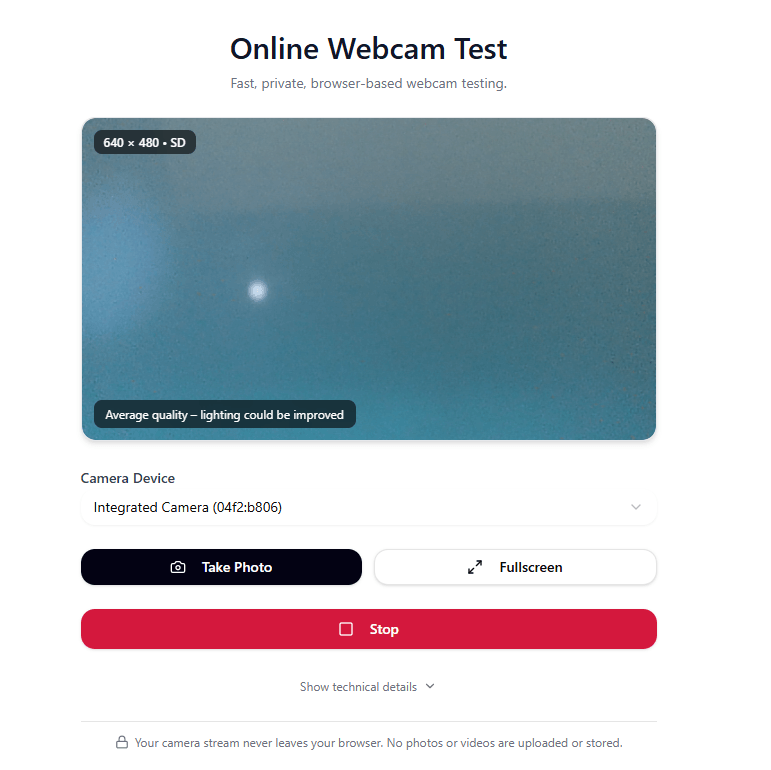
Your webcam is working. The page shows your live feed, camera resolution, and a quality indicator.
Here is what to look for:
- You see an image — your camera is working.
- The resolution is shown (e.g. 640x480, 1280x720) — this tells you the quality your camera is outputting.
- Camera Device dropdown — if you have more than one camera (built-in + external), use this dropdown to switch between them.
You can also click Take Photo to capture a snapshot, or Fullscreen to expand the preview. When you are done, click Stop.
The privacy notice at the bottom confirms: Your camera stream never leaves your browser. No photos or videos are uploaded or stored.
Method 2: Test Your Webcam on Windows
If you prefer to test without opening a browser, Windows has a built-in Camera app.
Step 1. Open the Camera app
Click the Start button on your taskbar (or press the Windows key on your keyboard). Type camera in the search bar. You will see the Camera app appear as the best match.
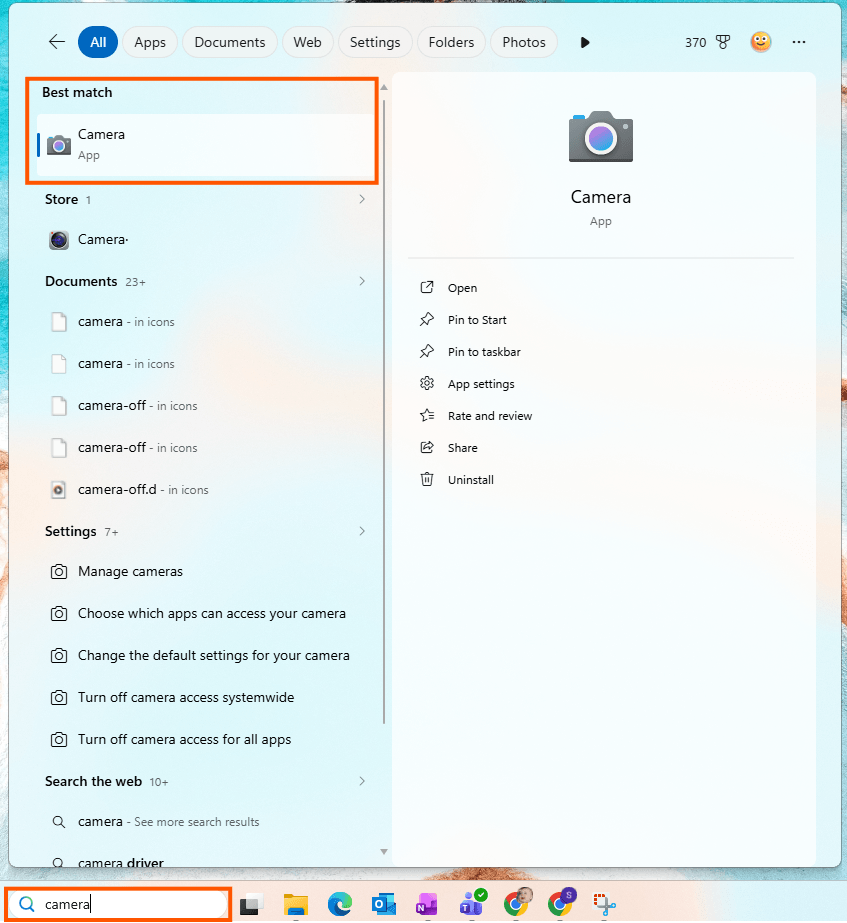
Type "camera" in the Start menu search. Click the Camera app to open it.
Click Camera to open it.
Step 2. Check your camera feed
The Camera app opens and immediately starts your webcam. If you see a live image, your camera is working.
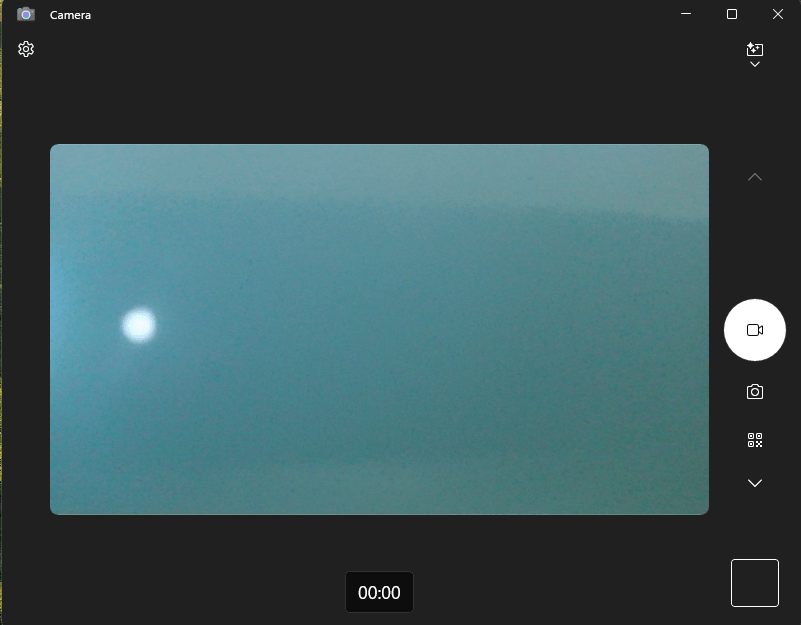
The Windows Camera app showing a live feed. If you see any image, your webcam is working.
You can use the icons on the right side to switch between video and photo mode, or to scan a QR code.
If you have more than one camera connected (for example, a built-in camera and a USB webcam), look for a camera switch icon in the top-right corner. Click it to cycle between cameras. If you only have one camera, this icon will not appear — that is normal.
Step 3. What if you see an error?
If the Camera app shows a grey screen with a camera icon and a warning that says "Your camera might be covered", it means Windows can detect your camera hardware but cannot get a video feed.
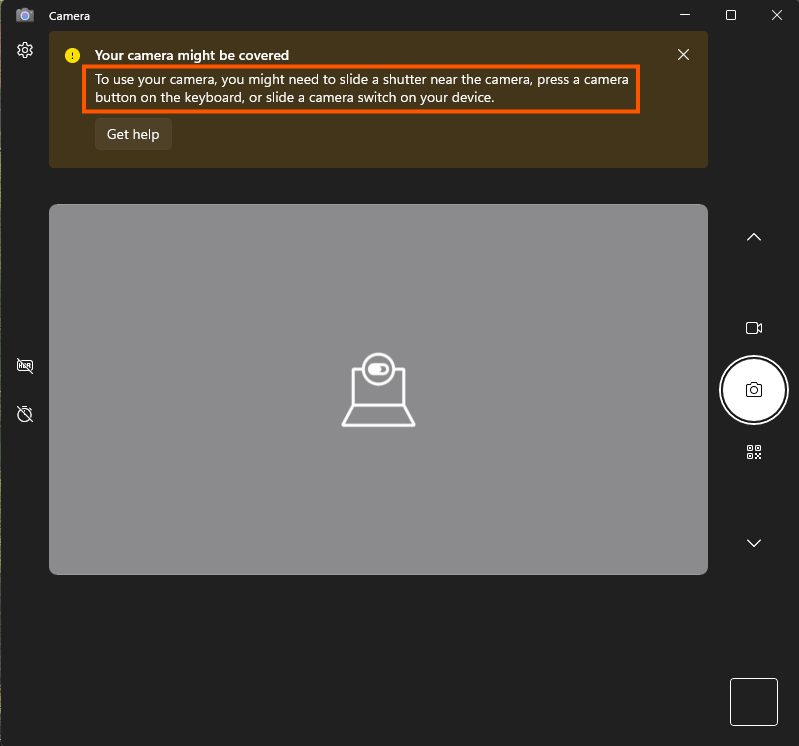
This error means the camera is detected but blocked. Check for a physical cover, privacy shutter, or another app using the camera.
Common reasons:
- Your laptop has a physical privacy shutter over the camera lens. Slide it open.
- Some laptops have a keyboard shortcut (function key) that disables the camera. Look for a camera icon on your F-keys and press Fn + that key.
- Another app (Zoom, Teams, OBS) is already using the camera. Close it and try again.
Method 3: Test Your Webcam on Mac
If you are on a Mac, the built-in Photo Booth app is the easiest way to check your camera.
Step 1. Open Photo Booth
Press Cmd + Space to open Spotlight Search. Type Photo Booth and press Enter.
Step 2. Check the camera
Photo Booth opens and immediately shows your webcam feed. If you see yourself, your camera is working.
Step 3. Switch cameras (if needed)
If you have multiple cameras connected (for example, a USB webcam and the built-in FaceTime camera), click Camera in the menu bar at the top of the screen and select the camera you want to test.
If you are using an iPhone as a Continuity Camera, make sure Continuity Camera is enabled in your iPhone settings under General > AirPlay & Continuity.
What to Check During Your Webcam Test
Your camera turning on is only the first step. Here are a few things to pay attention to:
- Is the image clear? If it looks blurry, clean your camera lens with a soft cloth. Even a fingerprint can make a noticeable difference.
- Is the lighting good? Face a window or a desk lamp. Avoid sitting with a bright light behind you — that creates a dark silhouette. The best setup is a light source in front of you, slightly above eye level.
- Is the camera at eye level? If you are using a laptop on a desk, the camera is usually below eye level, which can create an unflattering upward angle. Try raising the laptop with a stand or a stack of books.
- Is there lag or stuttering? Close other apps that use the camera or a lot of bandwidth. A slow connection can also cause webcam lag during video calls.
- Is the background appropriate? For work calls, check what is visible behind you. A clean, neutral background looks more professional.
Troubleshooting: Webcam Not Working?
If your webcam did not show a feed in either the browser test or the Camera app, work through these fixes in order. Most webcam issues are caused by permissions or settings, not hardware failure.
Fix 1. Check browser camera permission
If the browser test shows a black screen or an error, the site might be blocked from accessing your camera.
Click the lock icon (or tune icon) to the left of the address bar in Chrome. Look for the Camera setting. If it is toggled off or set to Block, switch it to Allow and reload the page.
![]()
Click the lock icon in Chrome's address bar. Make sure Camera is set to Allow.
Fix 2. Check Chrome camera settings
If the quick toggle did not help, check Chrome's global camera settings.
- Open Chrome and go to chrome://settings/content/camera (paste this into the address bar).
- Make sure "Sites can ask to use your camera" is selected (not "Don't allow sites to use your camera").
- Check the "Not allowed to use your camera" list. If you see the site you are testing, remove it.
- Under "Allowed to use your camera", confirm the site is listed.

Chrome camera settings. Make sure "Sites can ask to use your camera" is selected and the site is in the Allowed list.
Fix 3. Check Windows privacy settings
Windows has a master switch for camera access. If it is off, no app (including Chrome) can use your webcam.
- Press Win + I to open Settings.
- Go to Privacy & security > Camera.
- Make sure Camera access is set to On.
- Make sure Let apps access your camera is set to On.
- Scroll down and make sure Let desktop apps access your camera is set to On. This is the setting that controls whether Chrome can use your camera.
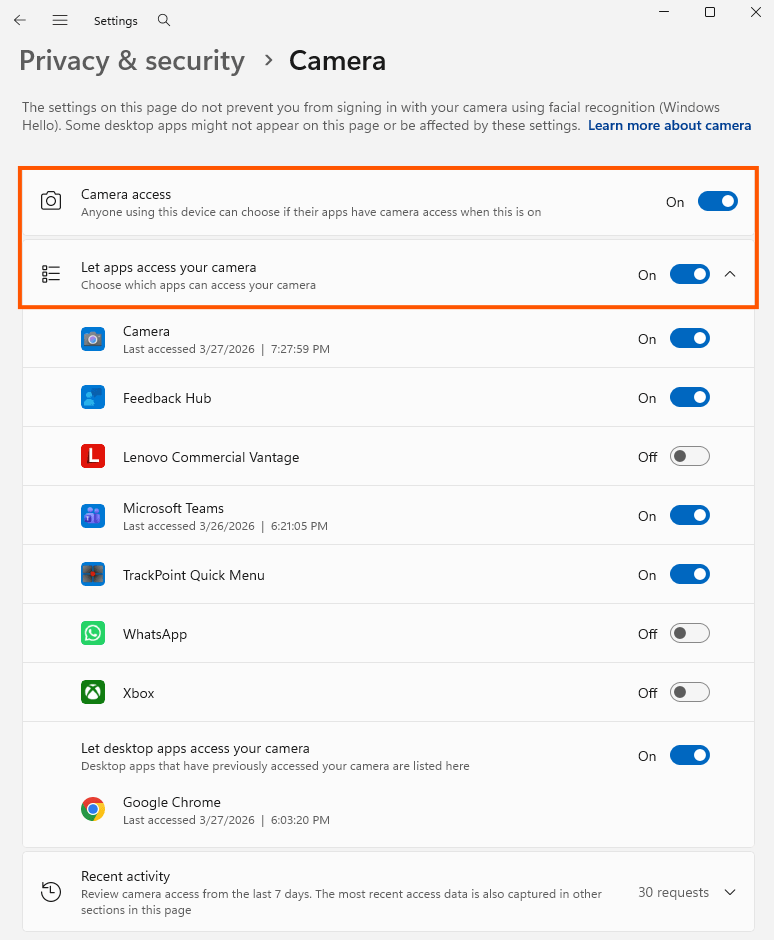
Windows Privacy & security > Camera. All three toggles should be On. Note that Google Chrome appears in the desktop apps list at the bottom.
Fix 4. Check your default input device
If Windows is using the wrong camera, you might get a feed from a device you do not expect (or no feed at all).
- Open Settings > System > Sound.
- Scroll down to the Input section.
- Make sure the correct device is selected. This screen also shows the input volume — check that it is not at zero.
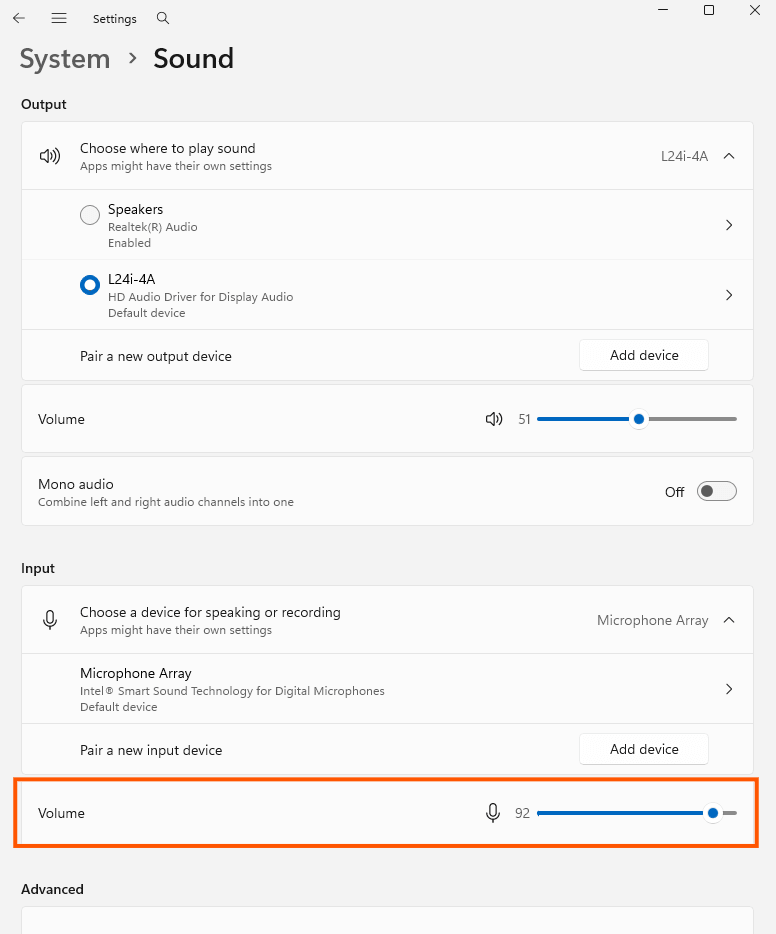
Windows Sound settings. Check the Input section to make sure the correct device is selected and the volume is up.
While this page is primarily for microphones, it confirms that Windows can see your input devices. For camera-specific device selection, use the Camera app or Chrome's camera settings.
Fix 5. Check Device Manager
If your camera is not showing up anywhere, it might be a driver issue.
- Right-click the Start button and select Device Manager.
- Look for Cameras in the list and expand it.
- You should see your webcam listed (e.g. "Integrated Camera").
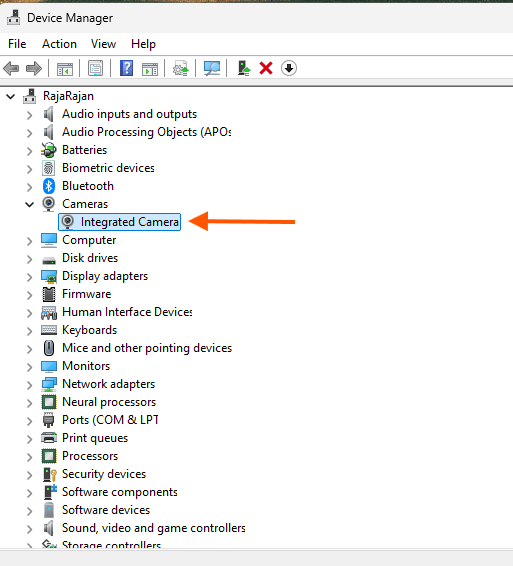
Device Manager showing the Cameras section. Your webcam should be listed here.
If your camera is listed but not working, try updating the driver:
- Right-click your camera in Device Manager.
- Click Update driver.
- Select Search automatically for drivers.
- If that does not help, click Uninstall device, then restart your computer. Windows will reinstall the driver automatically on reboot.
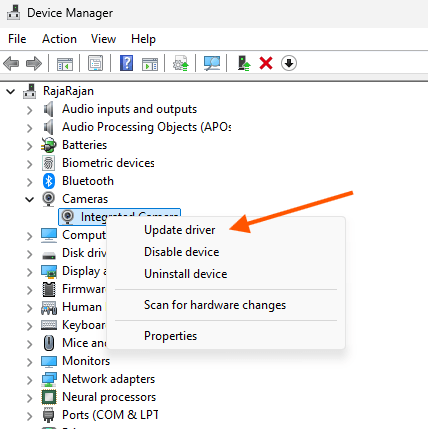
Right-click your camera and choose Update driver. If that fails, Uninstall device and restart.
Only choose Uninstall if the other options have not worked. Your camera will stop working until the driver is reinstalled after the restart.
Fix 6. Check for physical issues
If none of the software fixes have worked:
- Privacy shutter or cover — Many laptops have a physical slider or cover over the webcam. Make sure it is open.
- External webcam — Try a different USB port. If you are using a USB hub, connect the webcam directly to the laptop instead.
- Test on another device — If the same webcam does not work on a different computer, the hardware is likely faulty.
FAQ
How do I test my webcam without downloading anything?
Open the webcam test in your browser. It runs entirely in the browser — no download, no account, no installation needed. Your camera feed stays on your device and is never uploaded anywhere.
Why is my webcam showing a black screen?
The most common cause is another app using the camera. Close Zoom, Teams, OBS, or any other video app, then try again. If that does not help, check your browser and Windows privacy permissions using the steps in the troubleshooting section above.
Can I test my webcam on my phone?
Yes. Browser-based webcam tests work on mobile browsers too. Open the webcam test in Chrome or Safari on your phone and allow camera access when prompted.
How do I know if my webcam quality is good enough for video calls?
Most video calling apps (Zoom, Meet, Teams) work well with 720p (1280x720) resolution. The browser webcam test shows your camera's resolution in the preview. If it shows 720p or higher, you are good for most calls. For streaming or recording, 1080p is better.
My webcam works in one app but not another. Why?
Each app and website has its own camera permission. Check the camera settings in the specific app that is not working. In Chrome, use the lock icon in the address bar or go to chrome://settings/content/camera to manage permissions per site.
Quick Tip: Use the Chrome Extension
If you check your webcam before meetings regularly, the Chrome extension adds a one-click webcam and mic test directly from your browser toolbar. Click the icon, check your devices in seconds, and close it — no new tab needed.
Summary
You have three ways to test your webcam:
- Browser — Open the webcam test, click Start, allow camera access. Fastest option.
- Windows — Open the Camera app from the Start menu. Built-in, no internet needed.
- Mac — Open Photo Booth from Spotlight. Instant camera check.
If the camera does not work, start with browser permissions, then check Windows privacy settings, then check drivers in Device Manager. If nothing responds in any app, consider a hardware issue.
A 30-second test before your next call is all it takes. Open the webcam test and check right now.