Your Chromebook microphone stops working before a Google Meet call. Someone tells you they cannot hear you on Zoom. You record a voice note and get silence. Sound familiar?
Most Chromebook mic problems come down to one of three things: Chrome blocked the microphone for a site, the wrong input device is selected in ChromeOS audio settings, or a simple permission toggle is off. This guide walks you through every fix, from the quickest 30-second check to the last-resort factory reset.
On Windows instead? See our Windows microphone fix guide.
Jump to a Fix
- Quick Checklist
- 1. Test Your Mic First
- 2. Allow Mic Permission in Chrome
- 3. Check the Lock Icon in Chrome
- 4. Check Chrome Microphone Settings
- 5. Check ChromeOS Audio Settings
- 6. Use the System Tray Audio Panel
- 7. Restart Your Chromebook
- 8. Check for a Muted Keyboard Shortcut
- 9. Try Guest Mode to Isolate the Problem
- 10. School or Work Chromebook?
- 11. Test an External Microphone
- 12. Update ChromeOS
- 13. Powerwash (Last Resort)
- 14. When It Is a Hardware Problem
- FAQ
Quick Checklist
Run through this list first. Most issues are solved in under two minutes.
| Fix | When to use it | How to do it |
|---|---|---|
| Test your mic | Always start here — confirms software vs hardware | Open mictesting123.com → Start Microphone Test |
| Allow permission | Chrome just asked for mic access | Click Allow while visiting the site in the popup |
| Check the lock icon | You accidentally clicked Block or Never allow | Address bar → lock icon → Microphone → Allow |
| Chrome mic settings | Site blocked globally in Chrome | chrome://settings/content/microphone → remove from blocked list |
| ChromeOS audio settings | Wrong input device or volume at zero | Settings → Device → Audio → Input → correct device + volume up |
| System tray audio panel | Quickest way to switch mic input | Clock → audio row ">" → Input → select correct mic |
| Restart Chromebook | After any settings change or when something feels stuck | Clock → Power → Restart |
| Keyboard mute key | Mic muted at hardware level without realising | Press the mic mute key in the top row |
| Guest mode | Mic works after restart but stops, or extension suspected | Sign out → Browse as Guest → test mic |
| School/work device | Settings are greyed out or mic blocked by policy | Contact your IT admin |
| External microphone | None of the above worked — check if hardware is faulty | Connect USB or Bluetooth mic → test in mictesting123.com |
| Update ChromeOS | Audio bugs introduced in an older version | Settings → About ChromeOS → Check for updates |
| Powerwash | Last resort after everything else fails | Settings → System preferences → Reset → Powerwash |
1. Test Your Mic First
Before changing any settings, confirm whether the mic is actually broken or just blocked for one site. A browser-based mic test tells you this in 30 seconds.
Open the online microphone test in Chrome on your Chromebook.
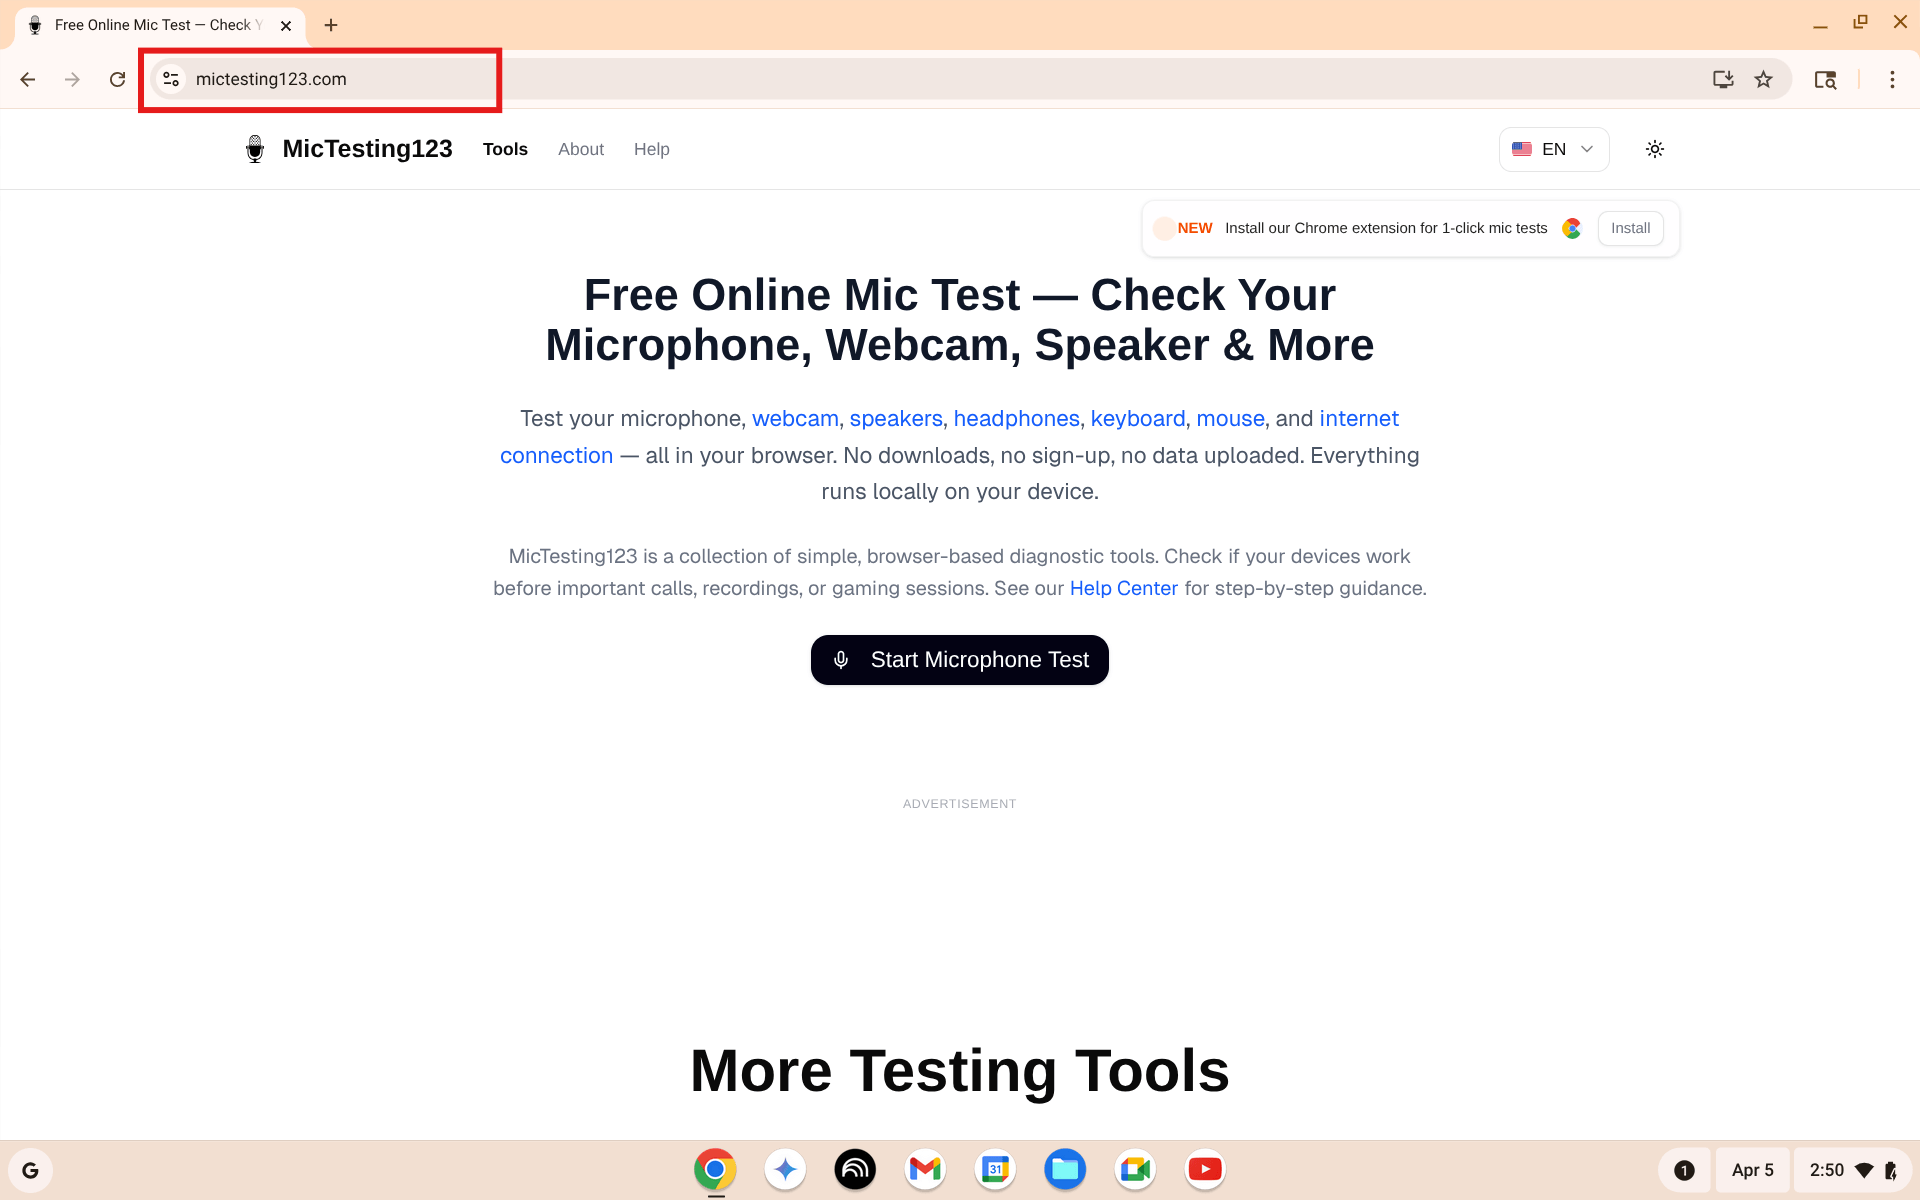
Open mictesting123.com on your Chromebook. Click Start Microphone Test to begin.
Click Start Microphone Test. Chrome will ask for microphone permission — click Allow while visiting the site.
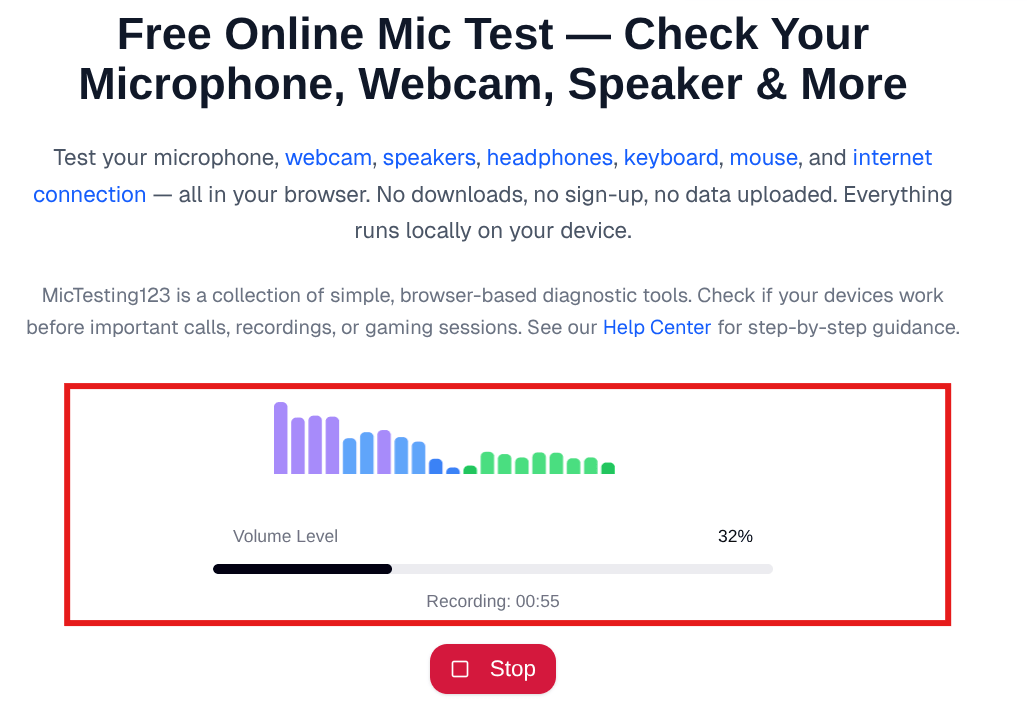
Speak into your Chromebook mic. If the volume bar moves, your mic hardware is working fine — the issue is a permission or settings problem.
What the result tells you:
- Bar moves — your mic hardware is fine. The problem is a permission or settings issue somewhere. Keep going through this guide.
- Bar does not move at all — mic is either blocked in Chrome or there is a hardware fault. Start with Fix 2 below.
- Error message on the test page — Chrome is blocking mic access for this site. Go straight to Fix 2.
If you hear your own voice echoing back during any test, run an echo test to check for audio feedback issues. If you hear background noise, a noise test can help identify the source.
2. Allow Mic Permission in Chrome
The most common Chromebook mic issue — Chrome asked for permission and you clicked the wrong button.
When you visit a site that needs your microphone, Chrome shows a popup near the address bar.
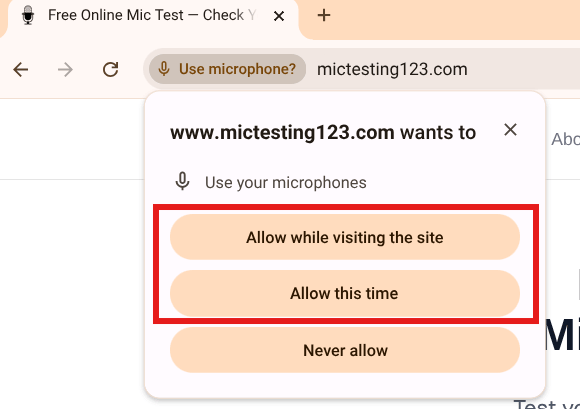
Chrome asks for microphone access. Click "Allow while visiting the site" for regular use.
- Allow while visiting the site — mic works every time you visit
- Allow this time — mic works this session only, asks again next time
- Never allow — mic is permanently blocked for this site until you manually unblock it
If you previously clicked Never allow, the permission popup will not appear again automatically. You need to fix it manually — see Fix 3 below.
3. Check the Lock Icon in Chrome
If Chrome already blocked your mic for a site, fix it from the address bar without opening any settings page.
- Go to the site where your mic is not working
- Click the lock icon (or the tune/settings icon) to the left of the address bar
- Find Microphone in the dropdown
![]()
Click the lock icon in Chrome's address bar. If you see "Reset permission" it means the mic was previously blocked.
- If it shows Not allowed or the mic icon has a strikethrough, click the toggle to turn it on — or click Reset permission to clear the block
- Reload the page
![]()
The microphone detail view showing "Not allowed". Toggle it on or reset the permission, then reload the page.
- Chrome will ask for permission again — this time click Allow while visiting the site
4. Check Chrome Microphone Settings
If the lock icon fix did not work, check Chrome's global microphone settings page. A site might be on the blocked list globally.
- In the Chrome address bar, type or paste:
chrome://settings/content/microphone - Press Enter
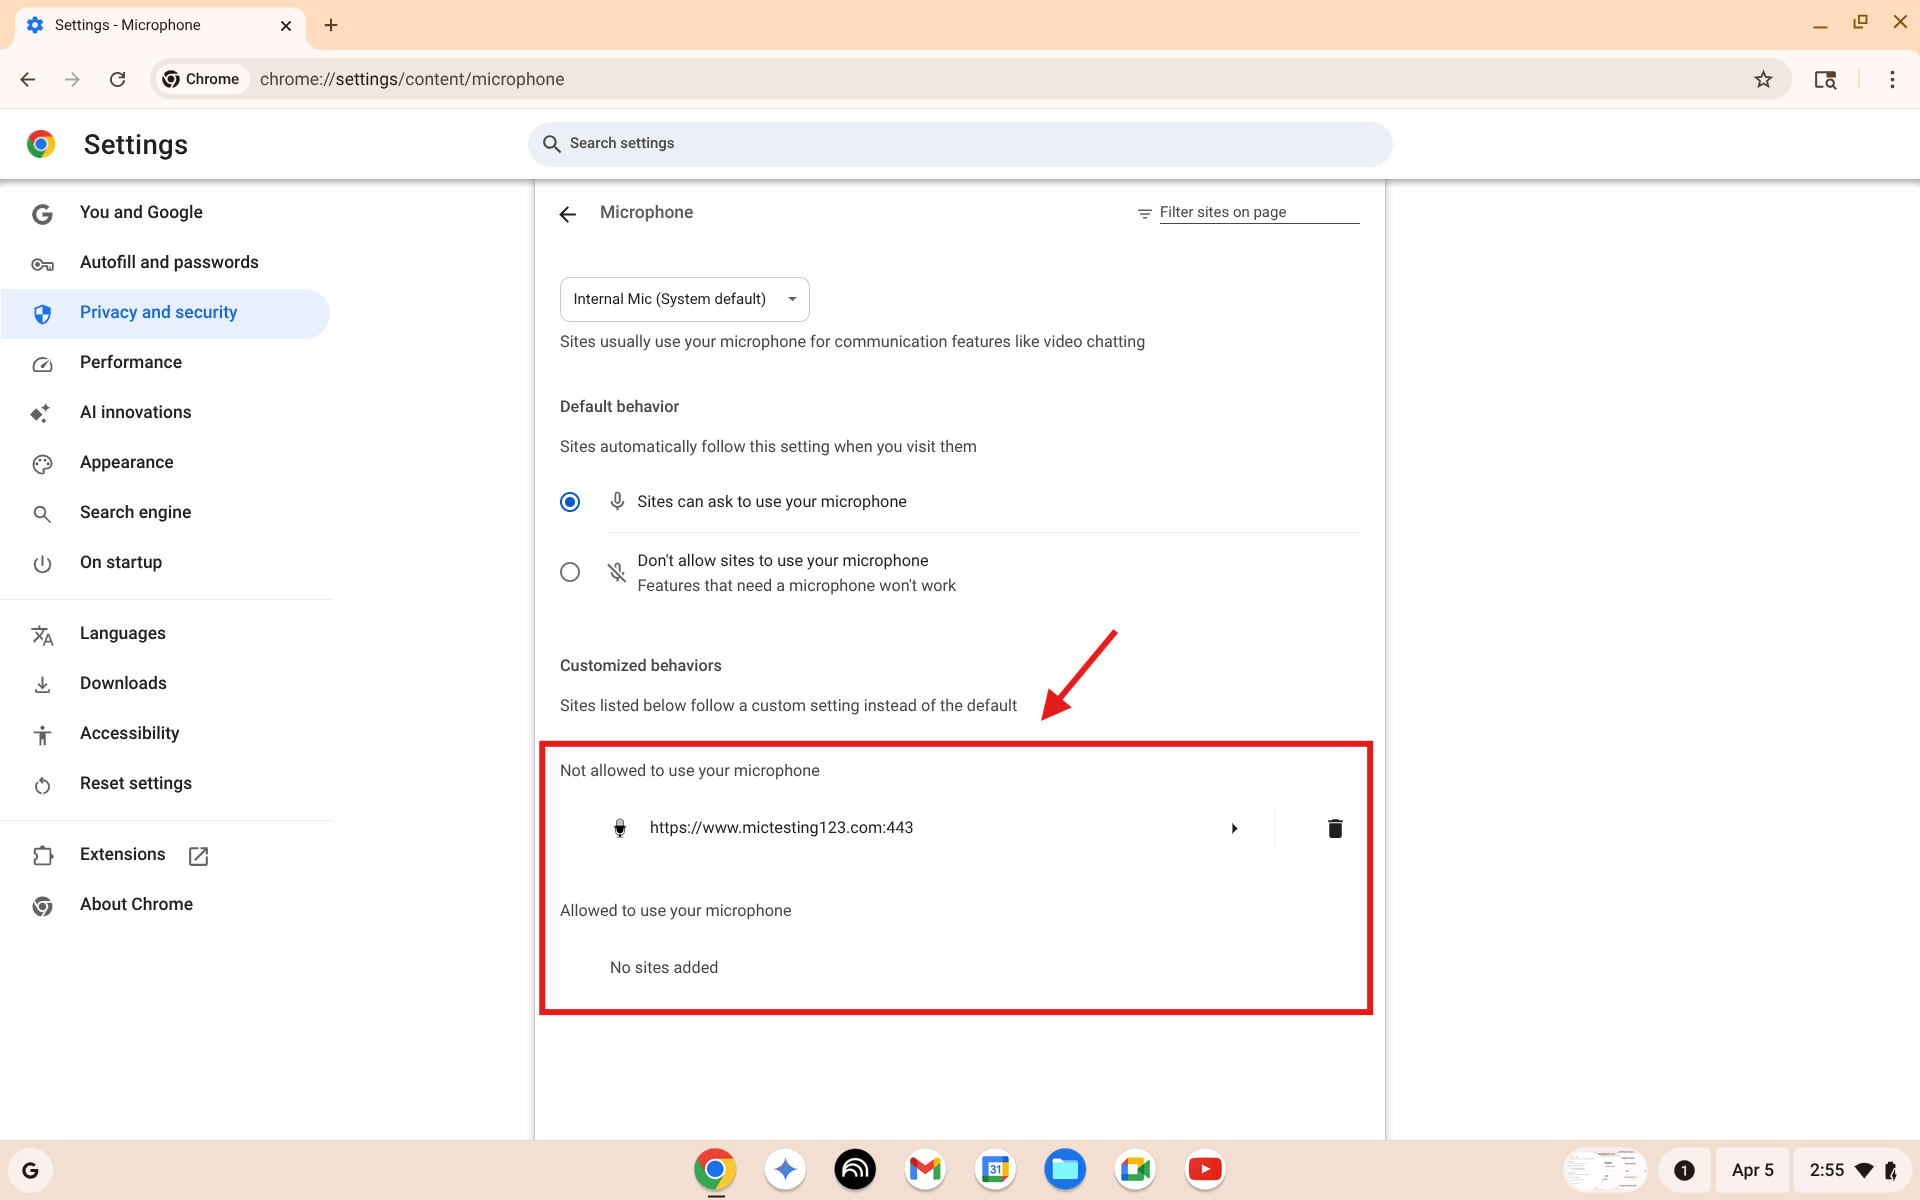
Chrome microphone settings. Check the "Not allowed to use your microphone" list. If your site appears there, remove it by clicking the trash icon.
- Make sure "Sites can ask to use your microphone" is selected at the top
- Under "Not allowed to use your microphone" — if you see the site you are testing, click the trash icon to remove it
- Under Default microphone at the top — make sure the correct mic is selected (Internal Mic is usually correct for the built-in microphone)
- Go back to the site and try again — Chrome will ask for permission now
5. Check ChromeOS Audio Settings
Chrome permissions are fine but mic still not working? The issue might be in ChromeOS itself — wrong input device selected or mic volume set to zero.
- Click the clock in the bottom-right corner of your screen
- Click the gear icon (Settings) in the system tray that opens
- In the left panel, click Device
- Click Audio
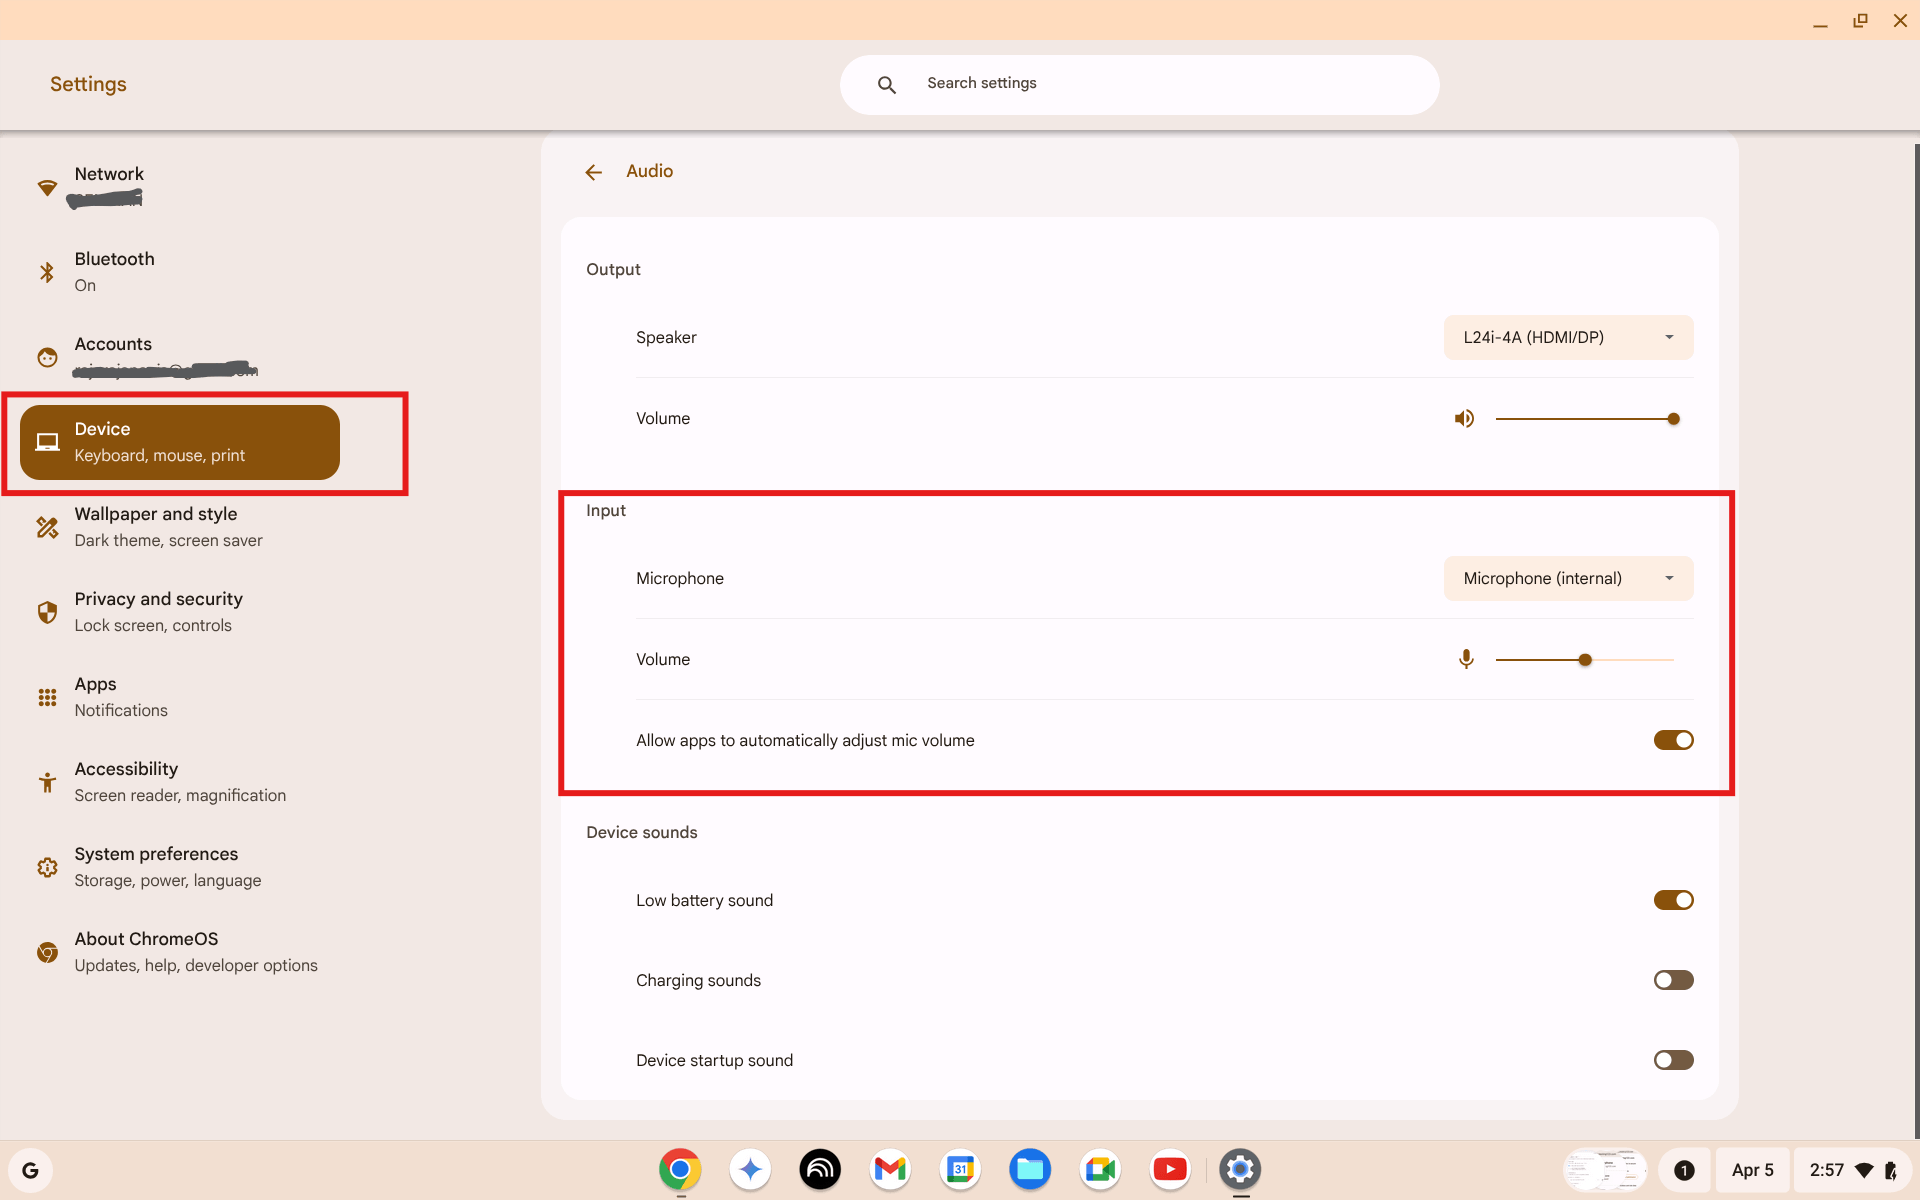
ChromeOS Settings → Device → Audio. Check the Input section. Make sure the correct microphone is selected and the volume slider is not at zero.
- Under Input, check two things:
- Microphone dropdown — make sure it shows Microphone (internal) for the built-in mic, or your external device if you have one plugged in
- Volume slider — make sure it is not at zero. Set it to around 75% as a starting point
- Speak into your mic — the volume slider should show a small animation if the mic is picking up sound
If no animation appears even with the correct device and volume up, try the system tray shortcut in Fix 6.
6. Use the System Tray Audio Panel
The system tray gives you quick access to switch your microphone input without going into the full Settings menu.
- Click the clock in the bottom-right corner
- In the quick settings panel, find the audio row — the speaker icon row with a ">" arrow on the right

Click the clock to open the system tray. Find the audio row and click the ">" arrow on the right.
- Click the ">" arrow on the audio row to expand the audio panel
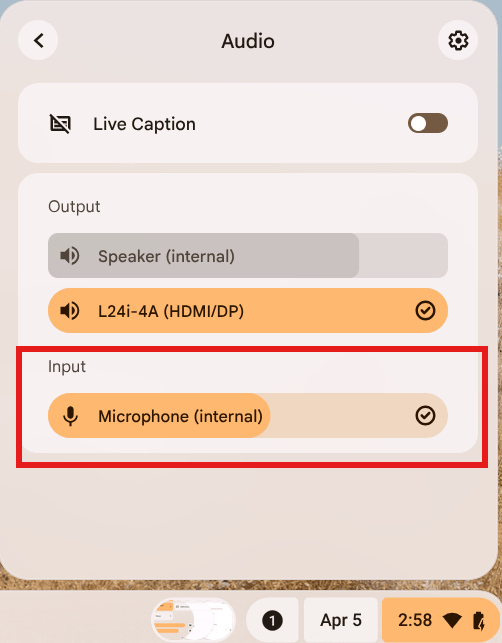
The expanded audio panel. Under Input, select the microphone you want to use. The active device shows a checkmark.
- Under Input, select Microphone (internal) — or your external mic if one is connected
- The active device shows a checkmark — confirm the right one is selected
- Close the tray and test your mic again
This is the fastest way to switch input devices, especially if you regularly connect headsets or external mics.
7. Restart Your Chromebook
Sounds simple — but a restart clears a surprising number of audio glitches, stuck permissions, and driver issues that nothing else fixes.
- Click the clock in the bottom-right corner
- Click the power icon (bottom-left of the quick settings panel)
- Click Restart — not Sign out, not Shut down
Wait for the Chromebook to fully restart and log back in, then test your mic again.
If the mic works after a restart but stops working again later, the issue is likely a specific extension or app. Try Fix 9 (Guest Mode) to narrow it down.
8. Check for a Muted Keyboard Shortcut
Chromebooks have a dedicated microphone mute key on the keyboard. It is easy to press by accident, especially on compact keyboards.
Look for the mic mute key:
- It looks like a microphone with a line through it
- Usually found in the top row of function keys (F-row area)
- On most Chromebooks it is in the F7–F9 area of the top row
To unmute:
- Press that key once — the mic mute indicator in the status bar (bottom-right) should disappear
- Some Chromebooks show a microphone icon with a red slash in the system tray when muted — clicking it unmutes
Check if an app is muting you:
- Google Meet, Zoom, and other video apps have their own mute buttons separate from ChromeOS
- Make sure you are not muted inside the app itself — look for the mic icon in the app's toolbar
9. Try Guest Mode to Isolate the Problem
If your mic works in the browser mic test but not in a specific app or site, or if it works right after restart but stops again, a Chrome extension or profile setting is likely the cause. Guest Mode confirms this instantly.
- Click the clock → click your profile picture or name
- Click Sign out
- On the login screen, click Browse as Guest (bottom-left)
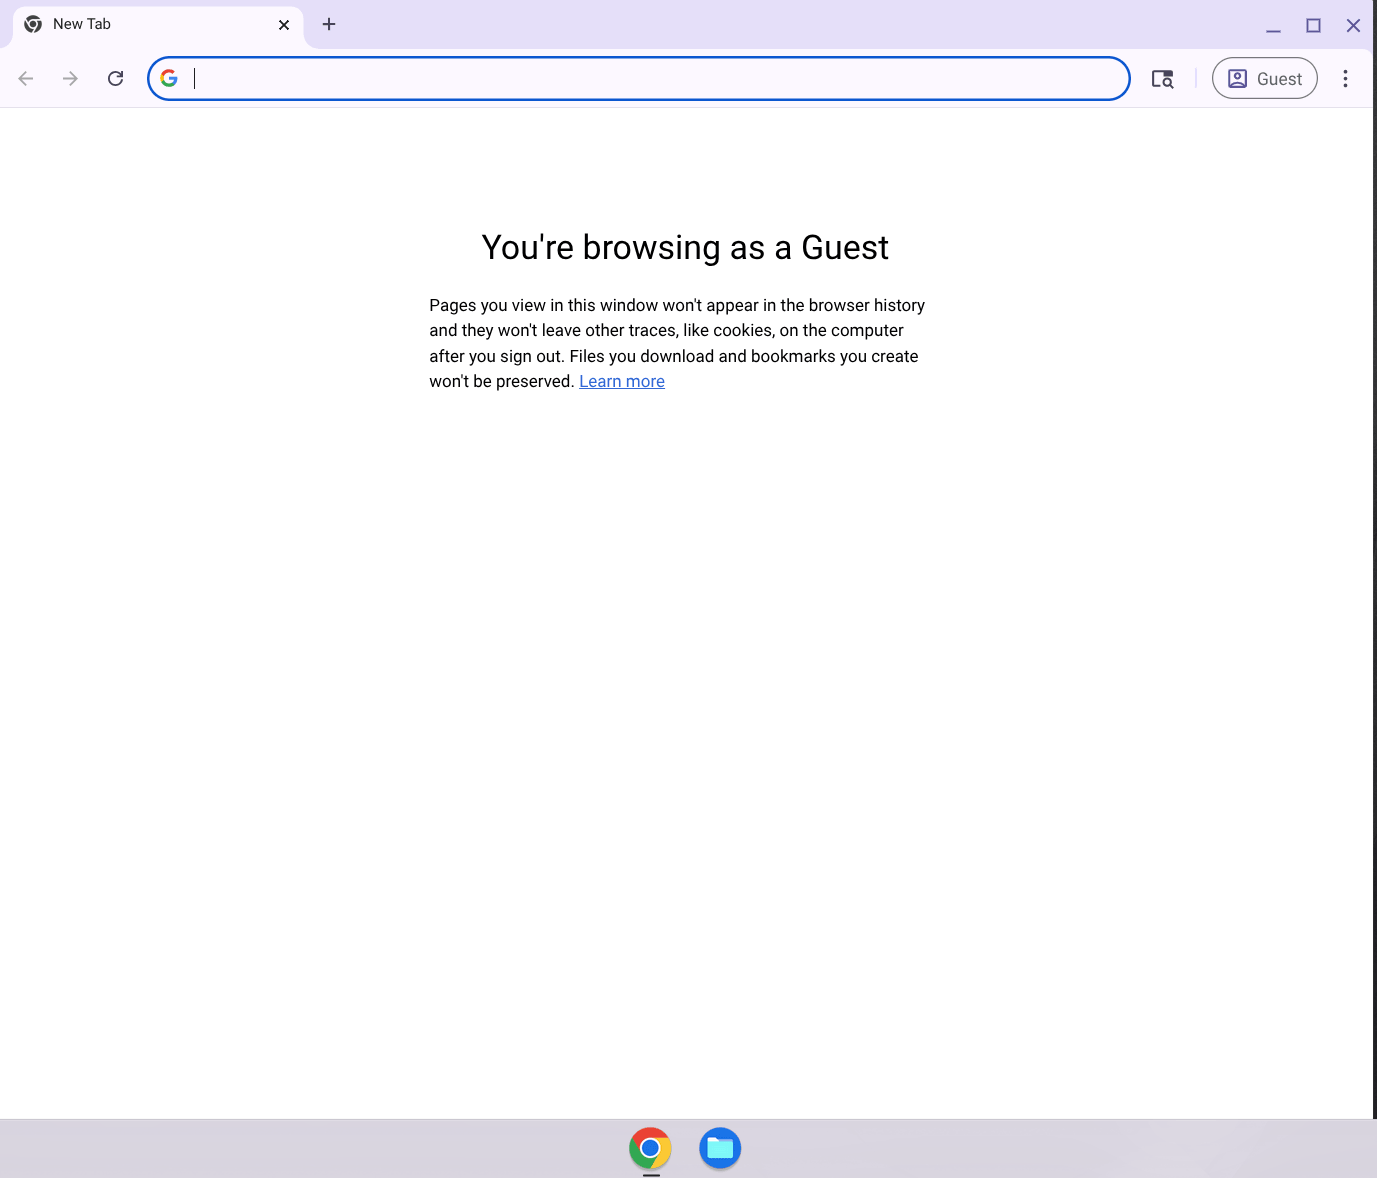
Guest mode opens a clean Chrome session with no extensions and no profile settings. If your mic works here, an extension is causing the problem in your main profile.
- In Guest mode, open the microphone test and check if it works
What the result means:
- Mic works in Guest mode — an extension or a profile-specific setting is blocking it in your main account. Go back to your account, open
chrome://extensions, and disable extensions one by one to find the culprit. - Mic does not work in Guest mode either — the problem is not your profile. It is a ChromeOS-level setting or hardware issue. Continue with Fix 10 onwards.
10. School or Work Chromebook
If your Chromebook is managed by a school, university, or employer, the administrator may have blocked microphone access through a device policy. This is common on school Chromebooks.
Signs your device is managed:
- You see a message at the bottom of the login screen: "This device is managed by..."
- Some Settings options are greyed out or missing
- Chrome shows a building/briefcase icon in the toolbar
What you can do:
- You cannot change admin-enforced policies yourself
- Contact your school's IT helpdesk or your company's IT support team
- Ask them to allow microphone access for the sites or apps you need
- If you need mic access urgently, ask if they can temporarily whitelist the specific site (such as Google Meet or Zoom)
There is no workaround for admin-enforced policies on managed devices — only the administrator can change them.
11. Test an External Microphone
If none of the software fixes have worked, testing with an external mic tells you whether the built-in microphone hardware is faulty.
Connect an external mic:
- USB microphone — plug into any USB port. ChromeOS detects it automatically. Go to System tray → Audio panel → Input and select the USB mic.
- 3.5mm headset — plug into the headphone jack. Make sure it is a headset (mic + headphones combined) not just headphones. ChromeOS auto-detects it.
- Bluetooth headset — go to Settings → Bluetooth, pair your device, then select it in the Audio Input panel.
After connecting, open the microphone test and check the external mic.
What the result means:
- External mic works — your built-in Chromebook microphone is likely faulty. Use the external mic as a workaround or contact the manufacturer for repair.
- External mic also does not work — the problem is in ChromeOS or Chrome settings, not the hardware. Continue with Fix 12.
12. Update ChromeOS
Older ChromeOS versions sometimes have audio bugs that Google has since fixed. A pending update might be the cause.
- Click the clock → click the gear icon (Settings)
- Scroll down in the left panel and click About ChromeOS
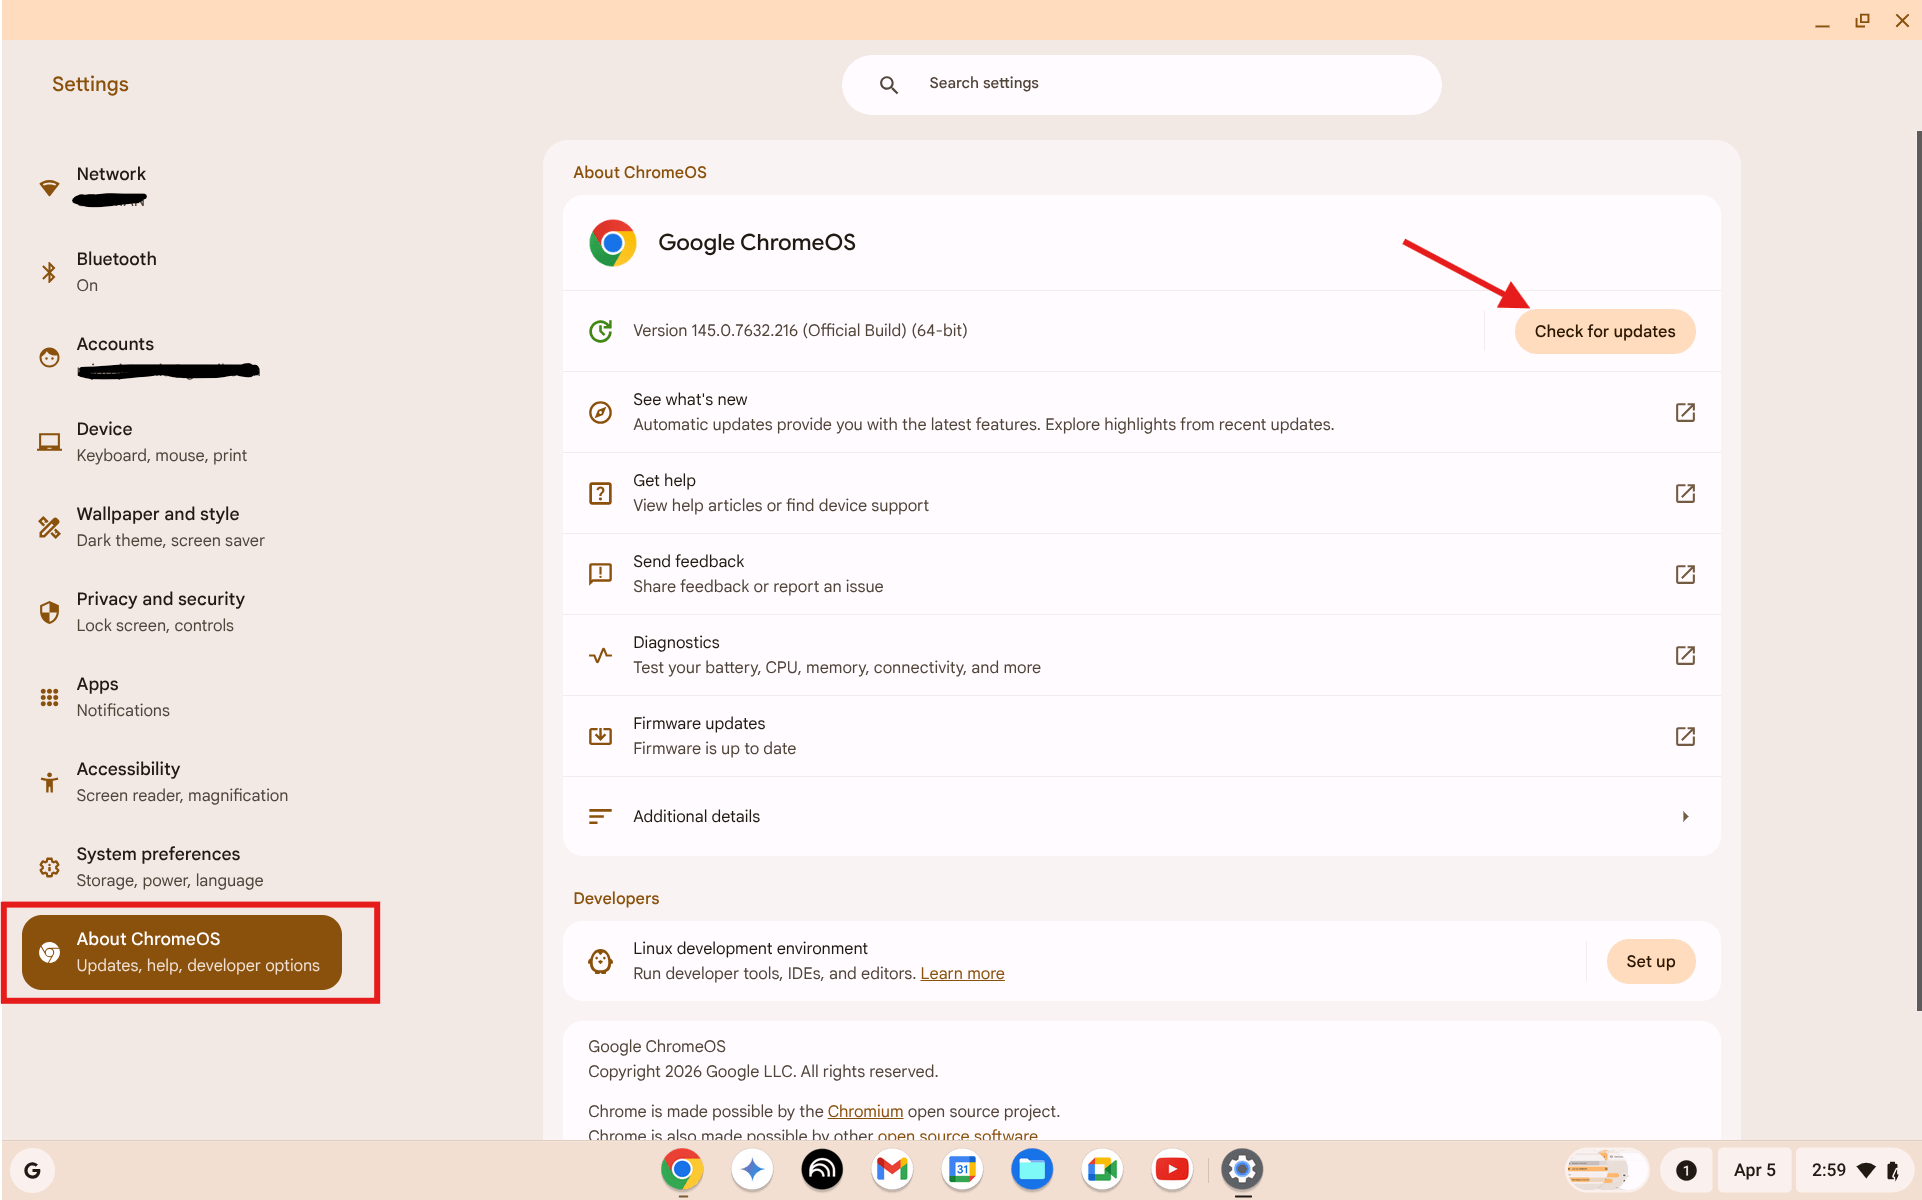
Settings → About ChromeOS. Click "Check for updates". If an update is available, install it and restart.
- Click Check for updates
- If an update is available, click Restart to update
- After the restart, test your mic again
ChromeOS updates automatically in the background when you are connected to WiFi. If you have been using your Chromebook offline or with automatic updates paused, there may be several updates pending.
13. Powerwash (Last Resort)
Powerwash is a factory reset. It wipes your Chromebook completely — all accounts, files, settings, and extensions are removed. Your Google account data (Drive files, Gmail etc.) stays in the cloud and comes back when you sign in again.
Only do this after you have tried everything else above.
- Sign in to your Google account and make sure any local files are backed up to Google Drive
- Click the clock → Settings → System preferences
- Scroll down to the Reset section
- Click Reset next to Powerwash
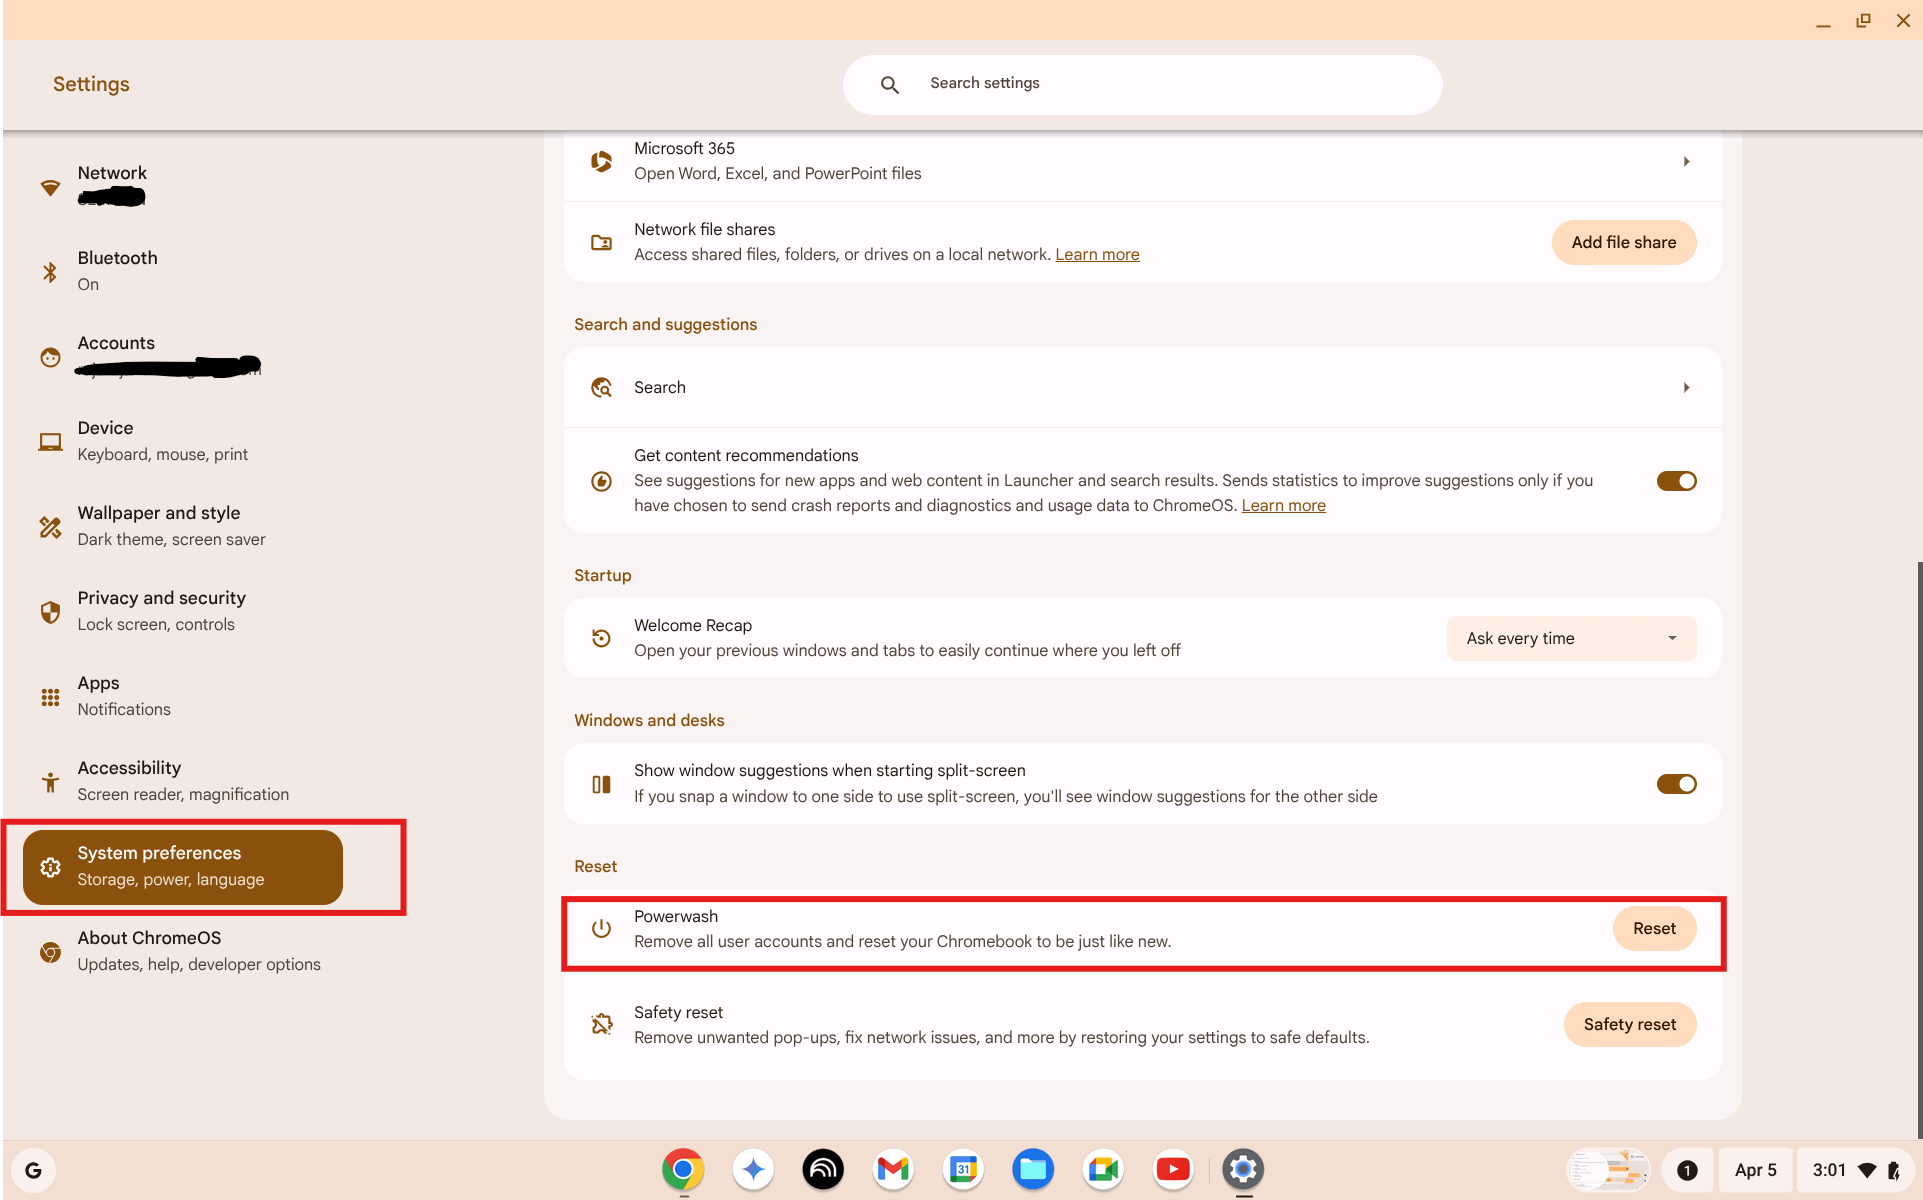
Settings → System preferences → Reset → Powerwash. Click Reset to start the factory reset process. This cannot be undone.
- Confirm the reset — the Chromebook restarts and wipes itself
- Set up your Chromebook again as if it were new
- Sign in to your Google account — your Drive files and bookmarks return automatically
- Test your mic before reinstalling extensions
If the mic works after a Powerwash, one of your extensions or a corrupted profile setting was the cause. Add extensions back one at a time to identify the problem one.
14. When It Is a Hardware Problem
Consider a hardware fault if:
- The mic does not respond in any app, website, or the ChromeOS audio settings input level
- The mic does not work even in Guest mode and after a Powerwash
- An external mic works fine but the built-in mic produces nothing
Options:
- Still under warranty — contact the manufacturer (Google, Acer, HP, Lenovo, ASUS, etc.) and request a repair or replacement
- Out of warranty — take it to a local repair shop, or use an external USB or Bluetooth microphone as a permanent workaround
- School or work device — report it to your IT team. They handle hardware replacements.
You can always use a browser-based mic test to confirm the hardware state before going for a repair. If the test shows zero input with the correct device selected, that is strong evidence of a hardware fault.
FAQ
Why does my Chromebook mic work in one app but not another?
Each website and app has its own microphone permission in Chrome. Just because Google Meet can use your mic does not mean Zoom or another site can. Check the lock icon in the address bar for the specific site that is not working, or go to chrome://settings/content/microphone and check the blocked list.
My mic stopped working after a ChromeOS update. What should I do?
This happens occasionally after updates. First restart your Chromebook fully. Then check ChromeOS Settings → Device → Audio to make sure the correct input device is still selected — updates sometimes reset audio preferences. If the problem persists, check for a follow-up update in About ChromeOS, as Google usually releases a fix quickly.
Can a Chrome extension block my microphone?
Yes. Some ad blockers, privacy extensions, and security tools can intercept or block microphone requests. Try Guest Mode — it runs without any extensions. If your mic works in Guest Mode but not your normal profile, go to chrome://extensions and disable extensions one by one until you find the one causing the problem.
How do I test my Chromebook mic without downloading anything?
Open the free microphone test in Chrome on your Chromebook. It runs entirely in the browser — no download, no account, no installation needed. Click Start Microphone Test, allow access when prompted, and speak. If the volume bar moves, your mic is working.
Will Powerwash fix a microphone hardware fault?
No. Powerwash resets software and settings but cannot fix physical hardware damage. If your mic does not work after a Powerwash, the built-in microphone itself is likely faulty and needs repair. Use an external USB microphone as a workaround while arranging a repair.
Summary
Most Chromebook mic problems are fixed by step 3 or 4 — a blocked permission in Chrome. Start with the mic test to confirm what you are dealing with, then work through the checklist at the top in order. If you want to run a full device check before your next call, the mic and webcam check guide covers both devices in under a minute.